

How To Make Your Eggologic Tower Garden
A garden system that offers you nutritious produce and lush green foliage without the hassle of digging, weeding, or daily watering - a tower garden is all this and more. It’s a vertical growing system perfect for those who are short on space, or lack the time or skill to grow and maintain traditional raised beds.
This guide breaks down everything you need to know about this amazing invention, from the benefits of a tower garden to the steps to create your very own.
What is a Tower Garden?
A tower garden is a space-optimising gardening system that allows plants to grow vertically instead of horizontally. A tower garden is a fantastic way to grow your favorite herbs, flowers, or favorite salad ingredients in a small space - indoors or outdoors - and making it happen is much easier than you might think!
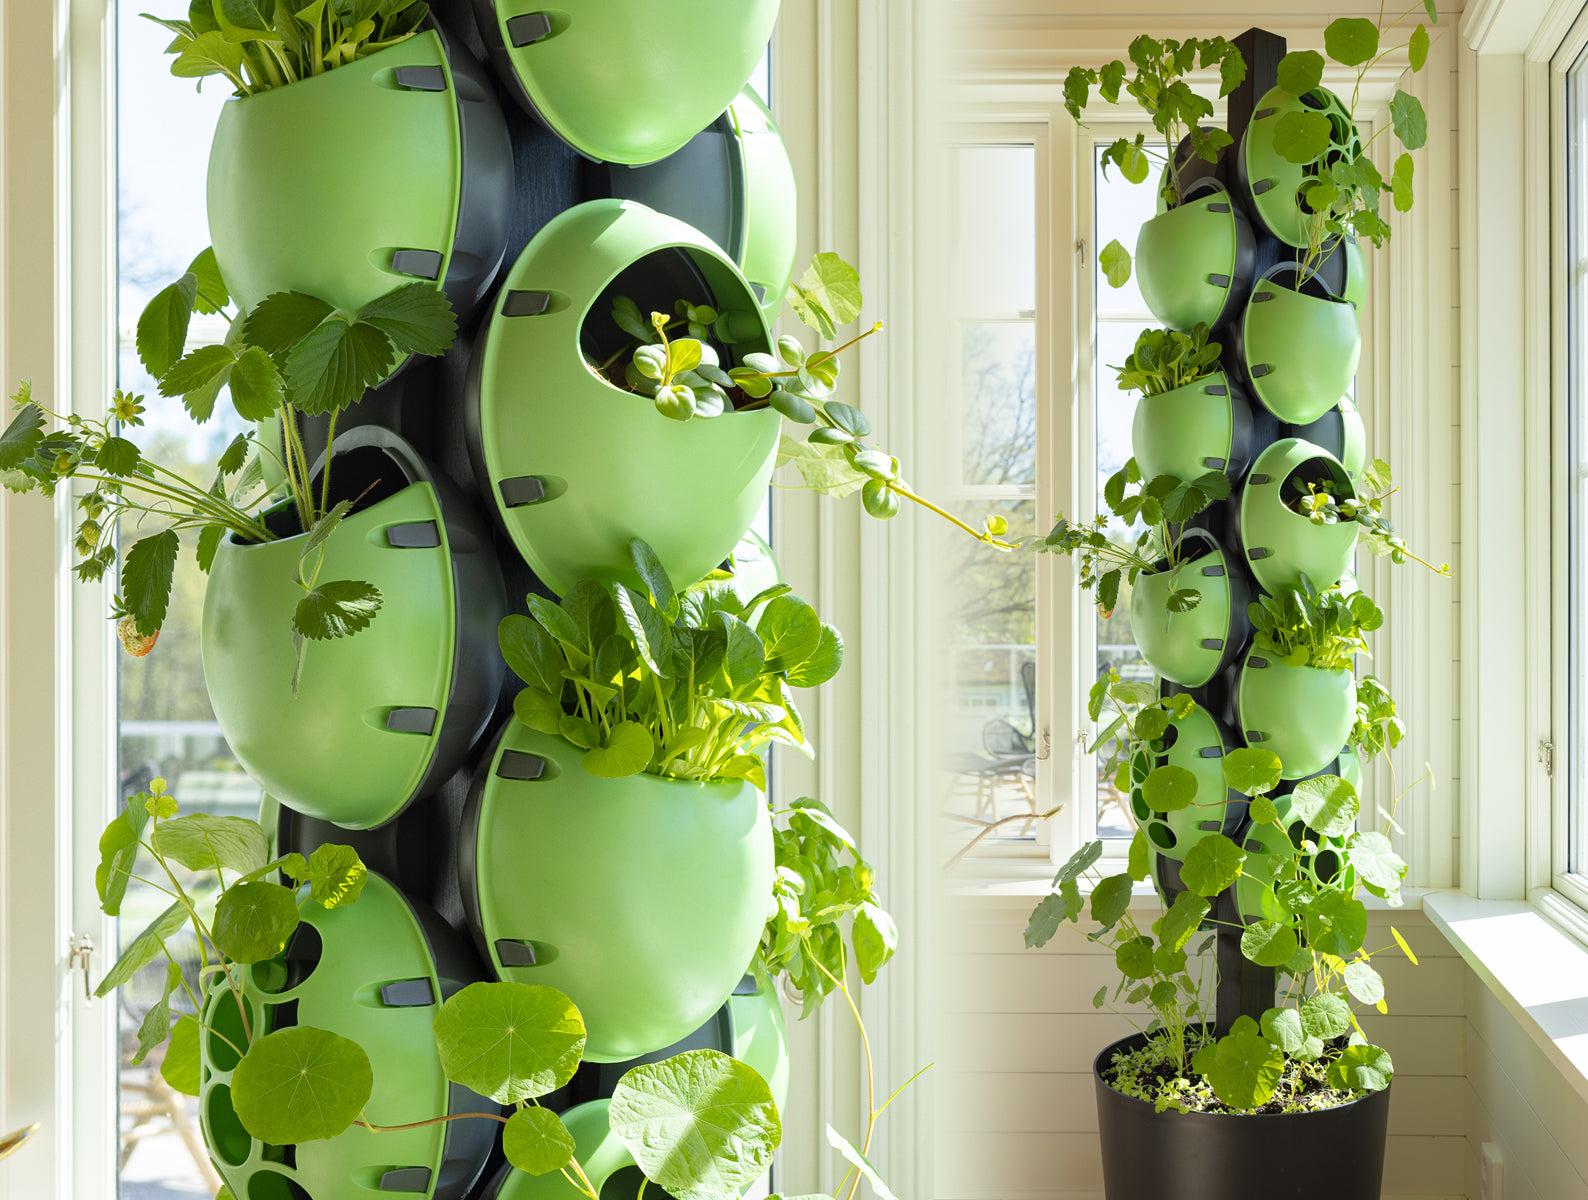
The result is homegrown and nutrient-dense produce that takes up minimal space. They are hands down a great way to turn balconies, patios, and rooftops into thriving hubs of fresh herbs, fruits, and leafy greens!
Indoor or Outdoor?
Both! All a tower garden needs is a few square feet of space. This makes them perfect for growing plants year-round, both indoors and outdoors. Because of their vertical, portable structure, tower gardens are less dependent on growing zone or weather conditions than traditional gardens.
You can set them up in balconies, porches, front yard, backyard, or move them indoors to a spot with ample sunlight. If well-lit spots are hard to come by, you can always use LED grow lights to grow fresh, organic, home-grown produce indoors.
Pro tip: Build your tower garden on wheels so you can move it and swivel it towards the sunlight.
Here are some plants that do wonderfully well in tower gardens:
-
Leafy greens: chard, lettuce, spinach, and kale.
-
Herbs: cilantro, chives, mint, basil, dill, oregano, sage, and thyme.
-
Fruits & veggies: Tomato, bell pepper, cucumber, strawberry, eggplant, carrot and radish
-
Edible and ornamental flowers: calendula, nasturtium, pansies, cosmos, hibiscus, and hyacinth bean.
How to Make Your Own Tower Garden with Eggologic

There are several ways to build a tower garden that suits your needs, and adding your own personal design touch is part of the fun. We do recommend reading through our tried-and-true instructions, especially Part 4 to help you maximize the Eggo Pods on your Tower Garden, for reference and inspiration.
As with any DIY project, the key goal when creating your tower garden is to make something that’s fun, functional, and above all safe. So grab your tool belt and happy building!
Step 1 - Post Selection - Material, Width & Height
At its essence, a tower garden is simply a wooden post with your favorite mix of Eggologic Wall Garden Pods attached on one or several sides.
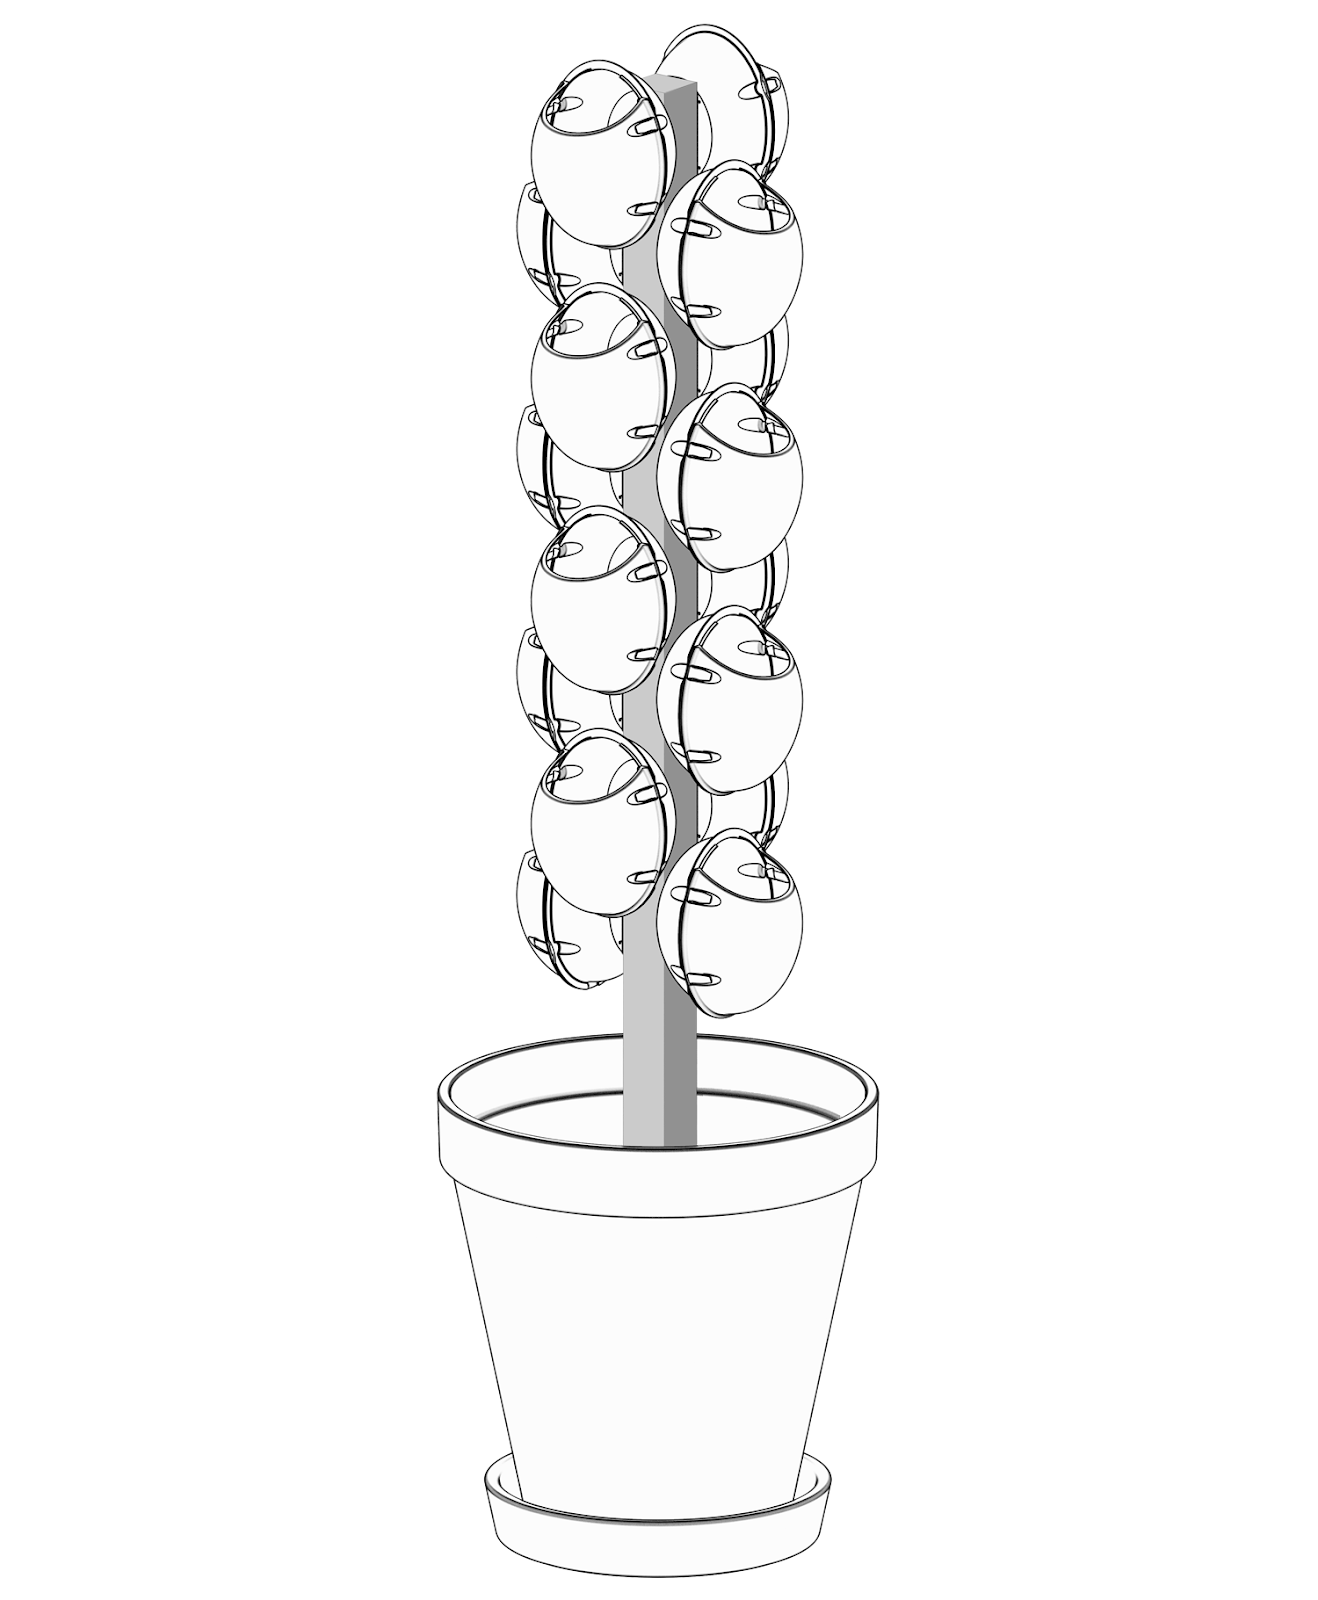
Because our pods all share the same mounting shell, it’s very easy to place them on several - or all - sides of a post as small as 70 x 70mm (2.75 x 2.75in) wide, which is a standard size at most hardware stores in the UK and Europe. A larger size post is okay, but smaller than 70 x 70mm isn’t recommended.
When deciding the post height for your tower garden, we recommend obtaining the tallest post you can reasonably work with, especially if you plan to build a ground-mounted outdoor tower. A 2-metre (6.5ft) post is a good choice. We’ve learned the hard way that it’s better to have extra height that you can remove than to be limited by a shorter height than desired in the final setup.
For a planter-mounted tower, plan for 60cm (2ft) of the post length to be needed just for mounting and sitting inside of the planter.
Note: If you decide to use a post made of treated wood and plan to mount it in a planter growing edibles, we recommend painting the post with a non-toxic sealant for safety.
Step 2 Assembling the Post Anchor
For an outdoor tower garden, we recommend using a standard, store-bought option like a hammer-in footer - but a potted garden is a bit more of a DIY project
What You Need
-
1 Large Planter Pot - at least 55cm wide x 55cm tall w/ drainage holes & Saucer
-
1 70x70mm untreated pine post @ 1.5 or 2 metres (5ft - 6.5ft) tall
-
1 1 metre (3.2ft) of untreated fencing board, ideally 2cm thick x 15cm wide
-
12-20 outdoor (coated or stainless) wood screws @ 5cm (2in) in length
-
1 large bag of large (6-10cm) stone garden pebbles
-
2 large bags of small (1-2cm) stone garden pebbles
-
2 bags of your favorite potting mix
-
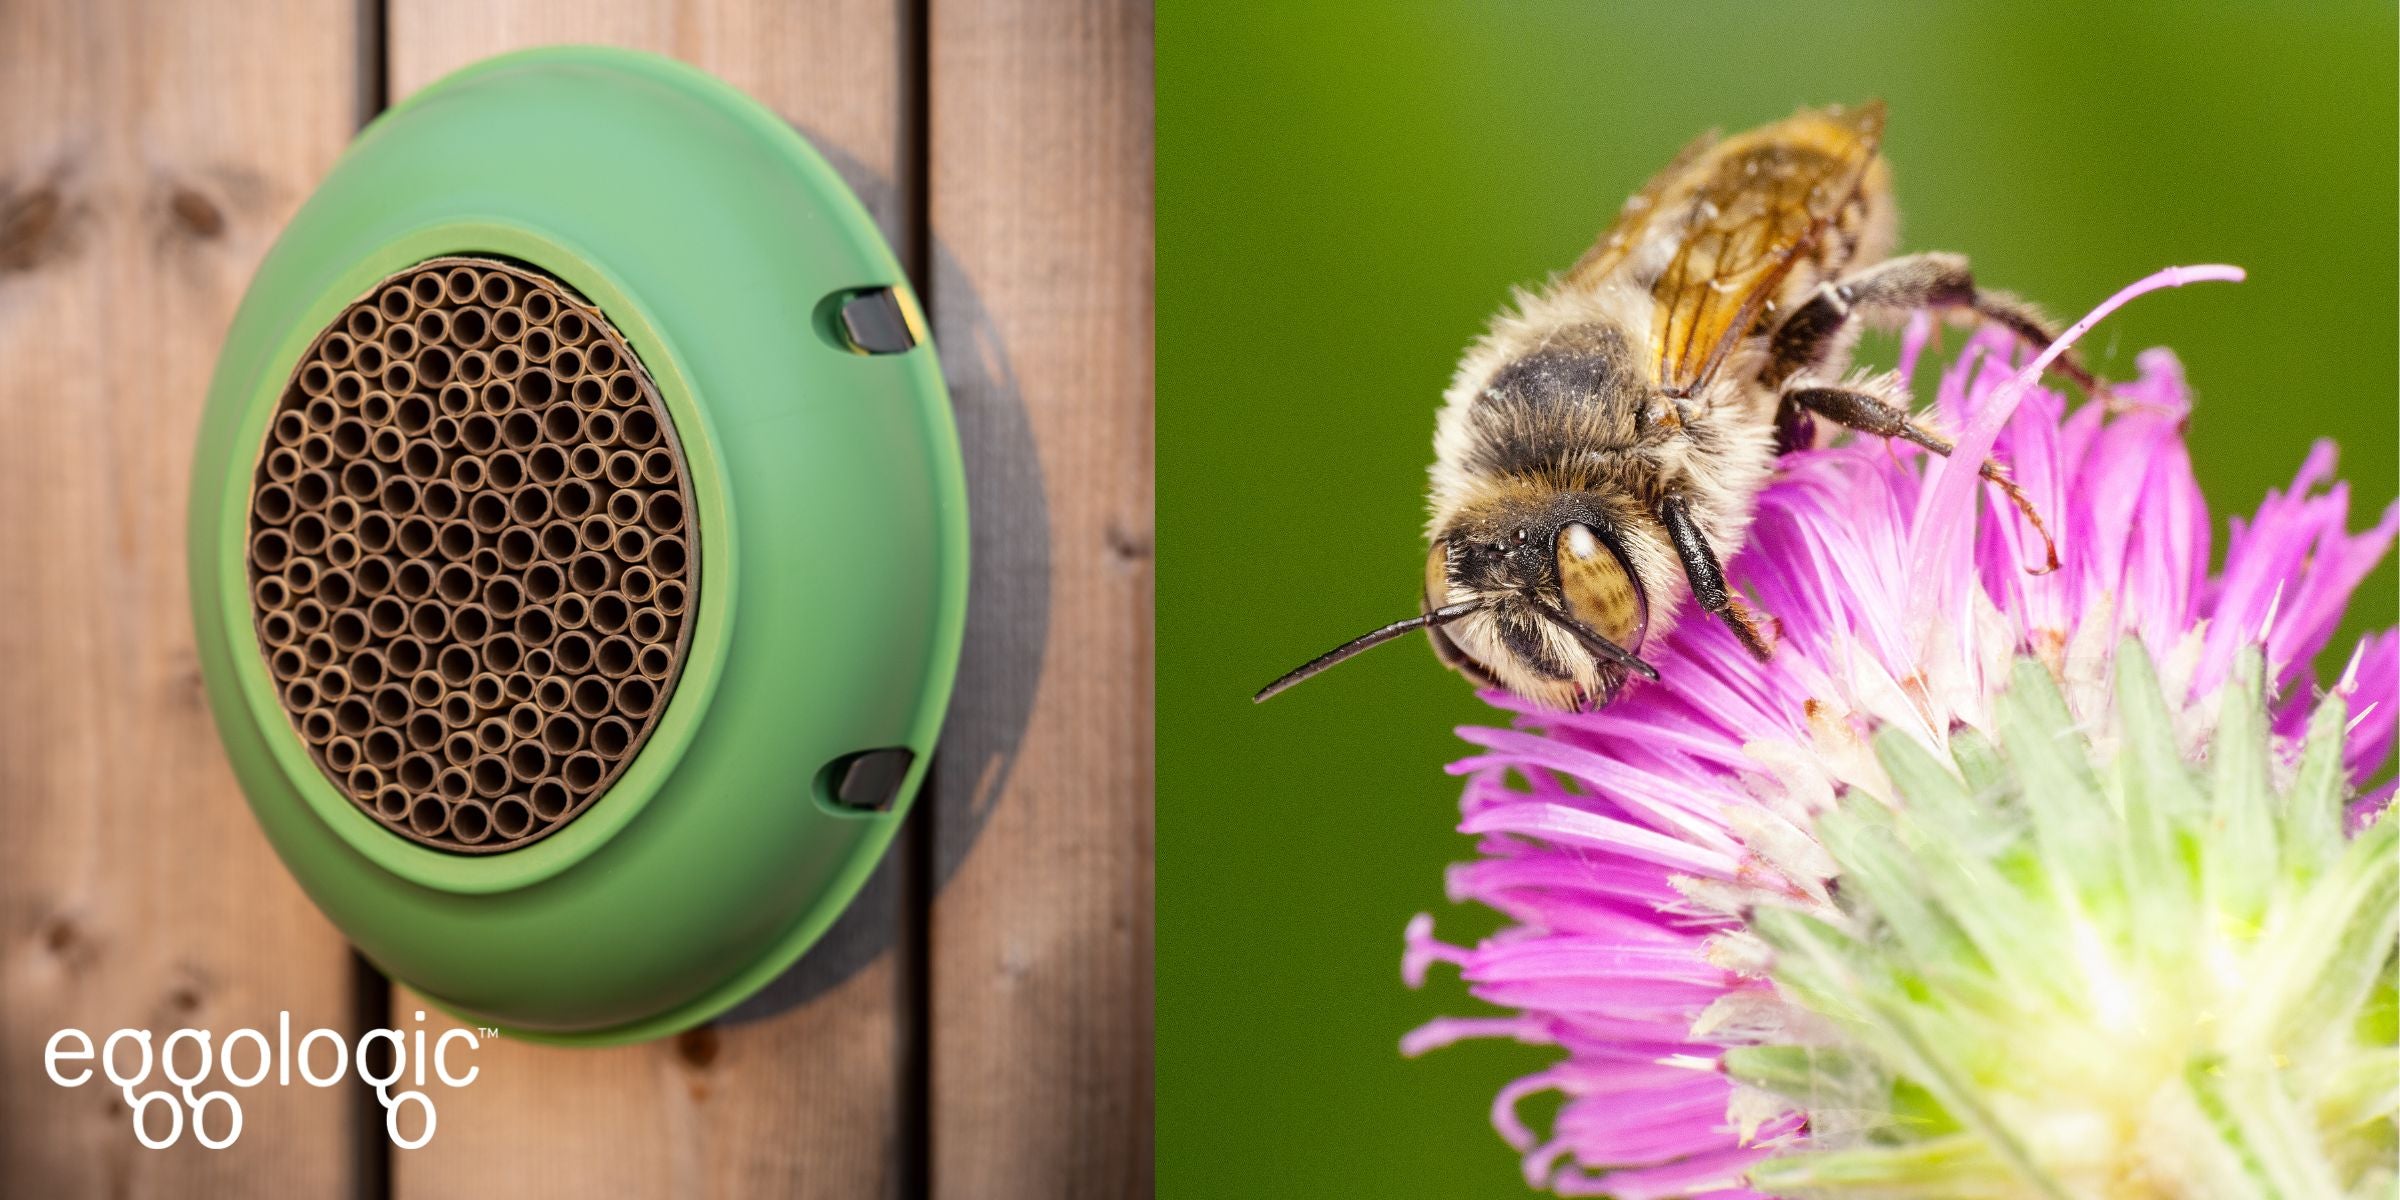
Eggologic pods - Wall Planter and Trellis Pods recommended
Tools
-
Handsaw or circular saw
-
Screwdriver (hand or electric)
-
Measuring tape
-
Carpenter’s angle
-
Level
Instructions
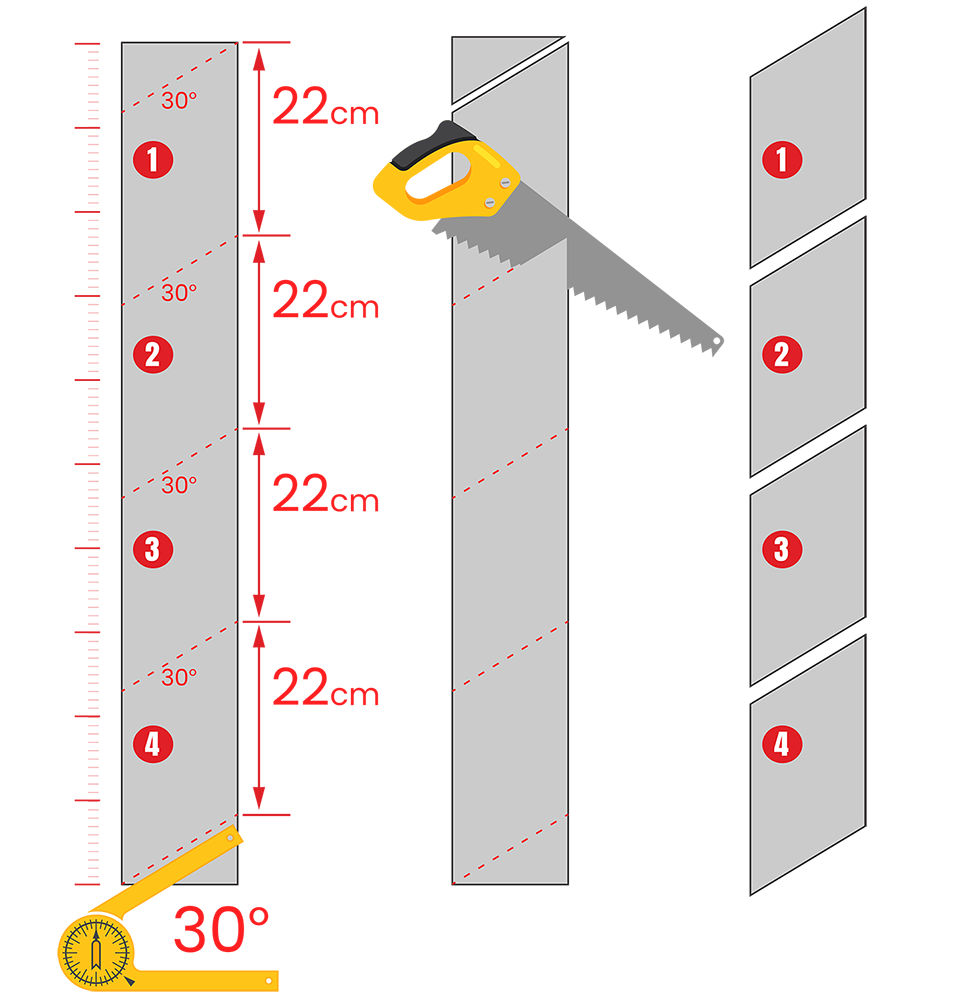
With the 1-metre piece of untreated fencing board, measure out the 4 pieces of wood that form the anchor on the post.
Each of these pieces will be cut at a 30-degree angle, so use your carpenter's square to mark the angle on one edge and then measure 4 equal lengths of board (we recommend 22 centimeters) down the board.
Cut out each piece carefully. The remaining corner pieces can be discarded.
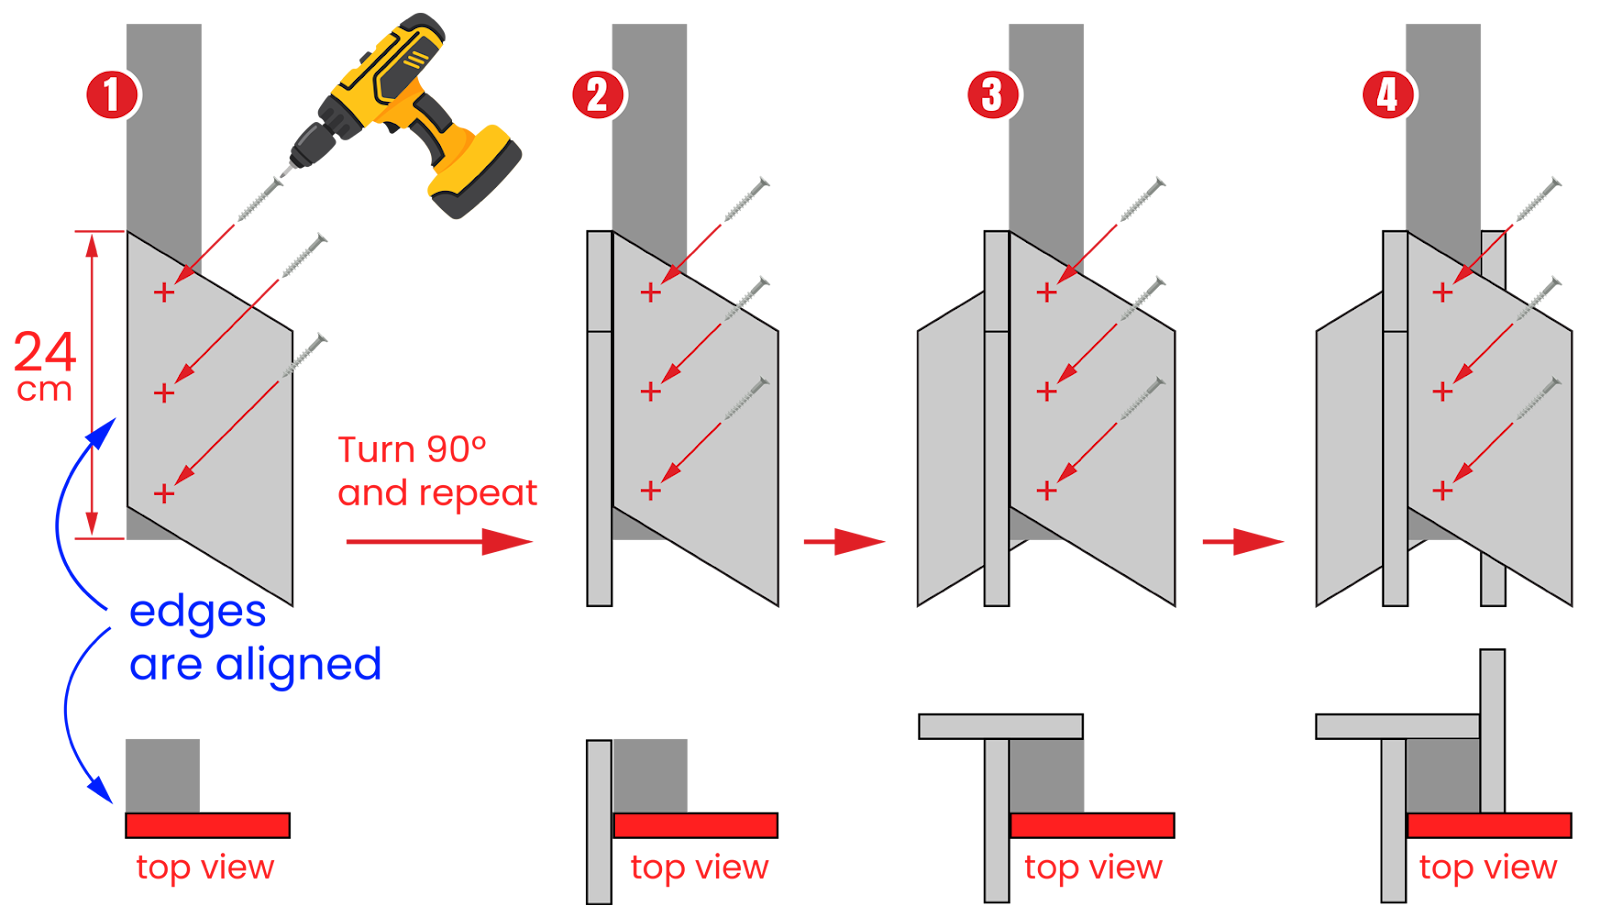
Then, measure and mark 24cm from the bottom edge of your post on each side. Now place one of the cut boards on the post as shown, with the top point of the slanting edge at the 24cm mark. Align the outer long edges of the post and cut board carefully before securing the board to the post with wood screws.
Once secured, take your time turning the post and repeating this step 3 more times until all 4 boards are placed. Make sure that the anchor boards are placed at the same height on the post, as these will form the legs that the post will rest on in the planter.
Your post anchor is finished and ready to go in the planter!
Step 3 - Placing and Securing the Post Anchor
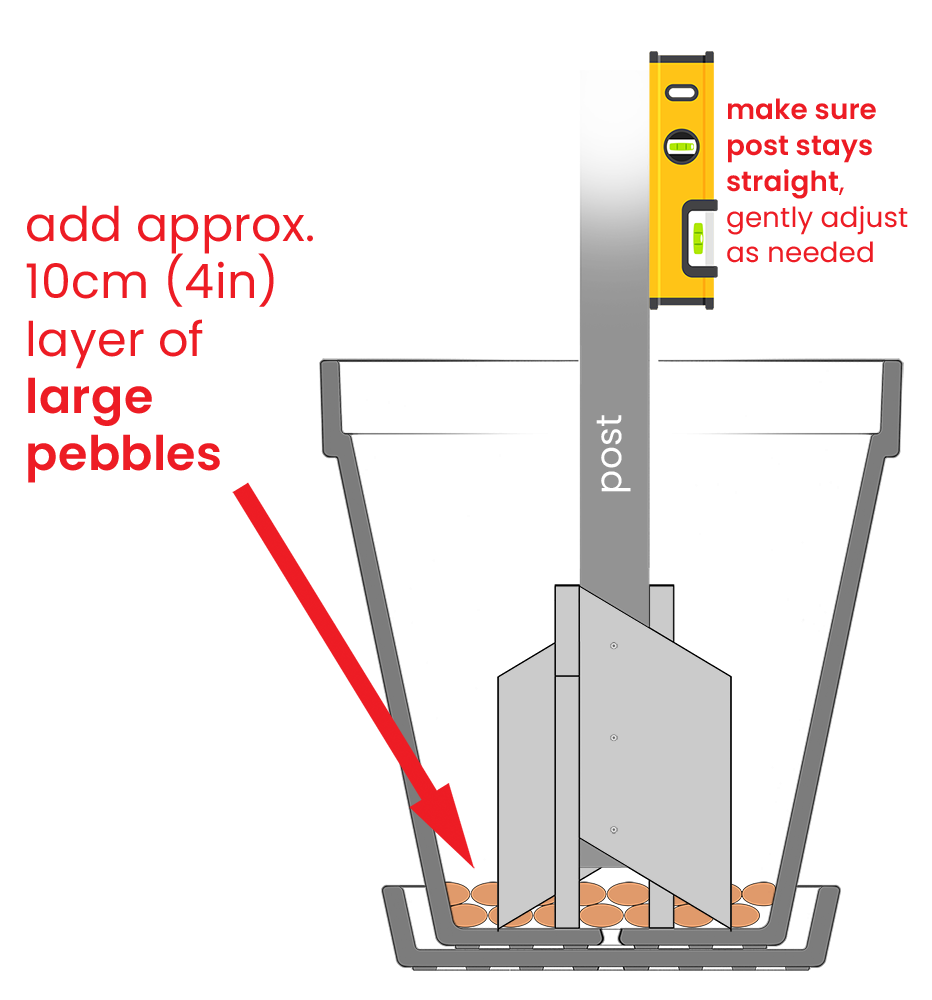
For the remaining steps, make sure to have the planter and saucer positioned in the FINAL growing place before starting. The planter and post setup will be too heavy to move after the stones and soil are added.


Place the post anchor-side down into the planter and center it carefully. Once placed, the post and anchor should rest well above the planter's drainage hole(s) to allow proper water movement.
Carefully add the large garden pebbles to the bottom of the planter around the anchor, being sure to distribute them evenly. We recommend a 10cm (4in) layer of large pebbles.
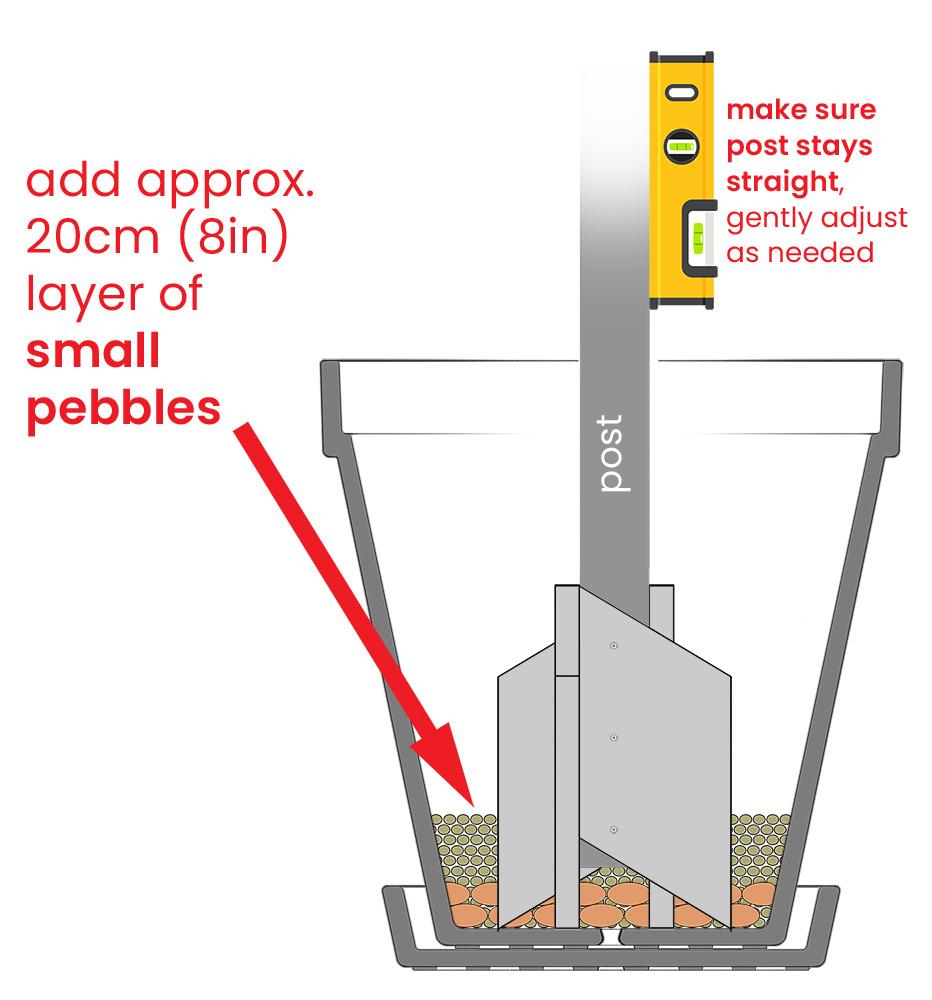
Then, add the small pebbles on top of the larger stones, carefully distributing and pressing them into crevices and gaps as needed. We recommend a 15-20cm (6-8 in) layer of small pebbles.
Finally, Add potting mix or your preferred planter soil mix.
Throughout this process, use a level to make sure the post is vertical on all sides, and adjust gently as needed.
Now it's time to have fun mounting your Wall Planter and Trellis Pods and planning and planting your new tower garden!
Step 4: Mounting Your Eggologic Pods on Your New Tower Garden!
To maximize the number of pods on all four sides of a 70mm post, we use a pattern that is mirrored on two opposing sides (A & C) and repeated again at a slightly lower starting point for the adjacent sides (B & D).
(For you herb nerds - we’re placing them like mint leaves, opposite, alternate.)
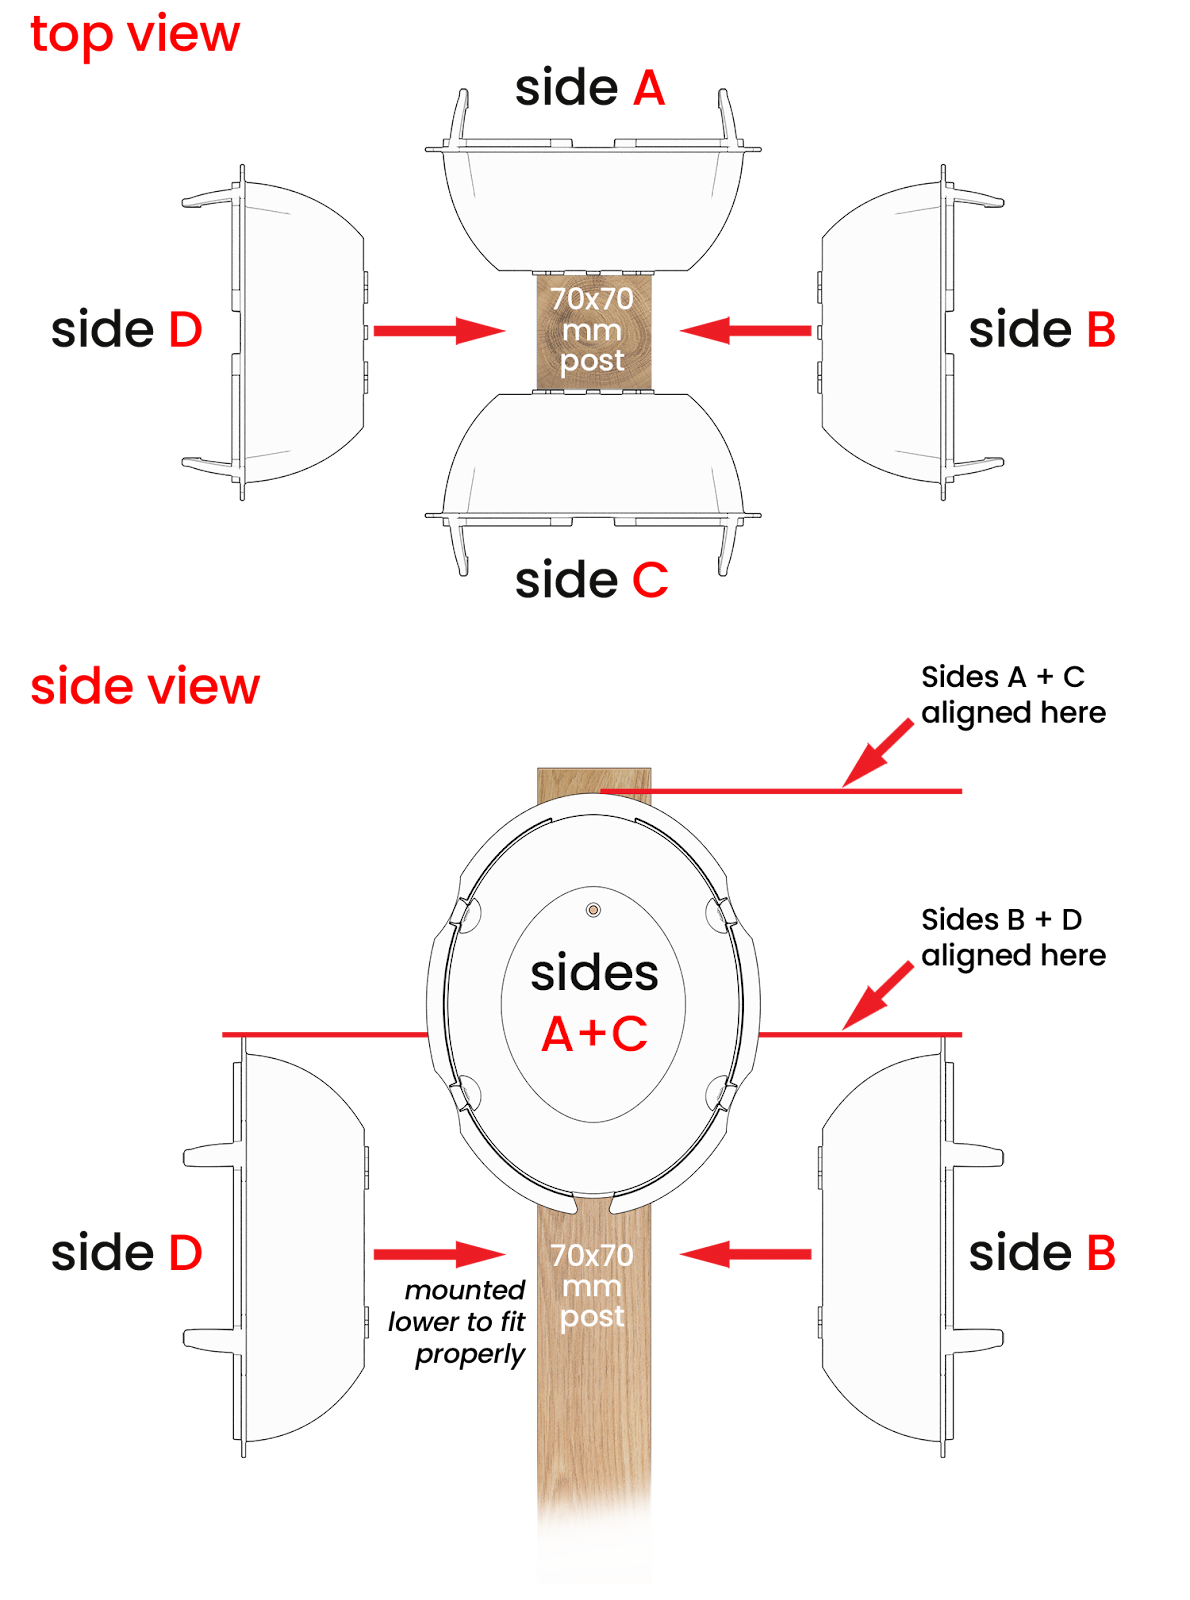
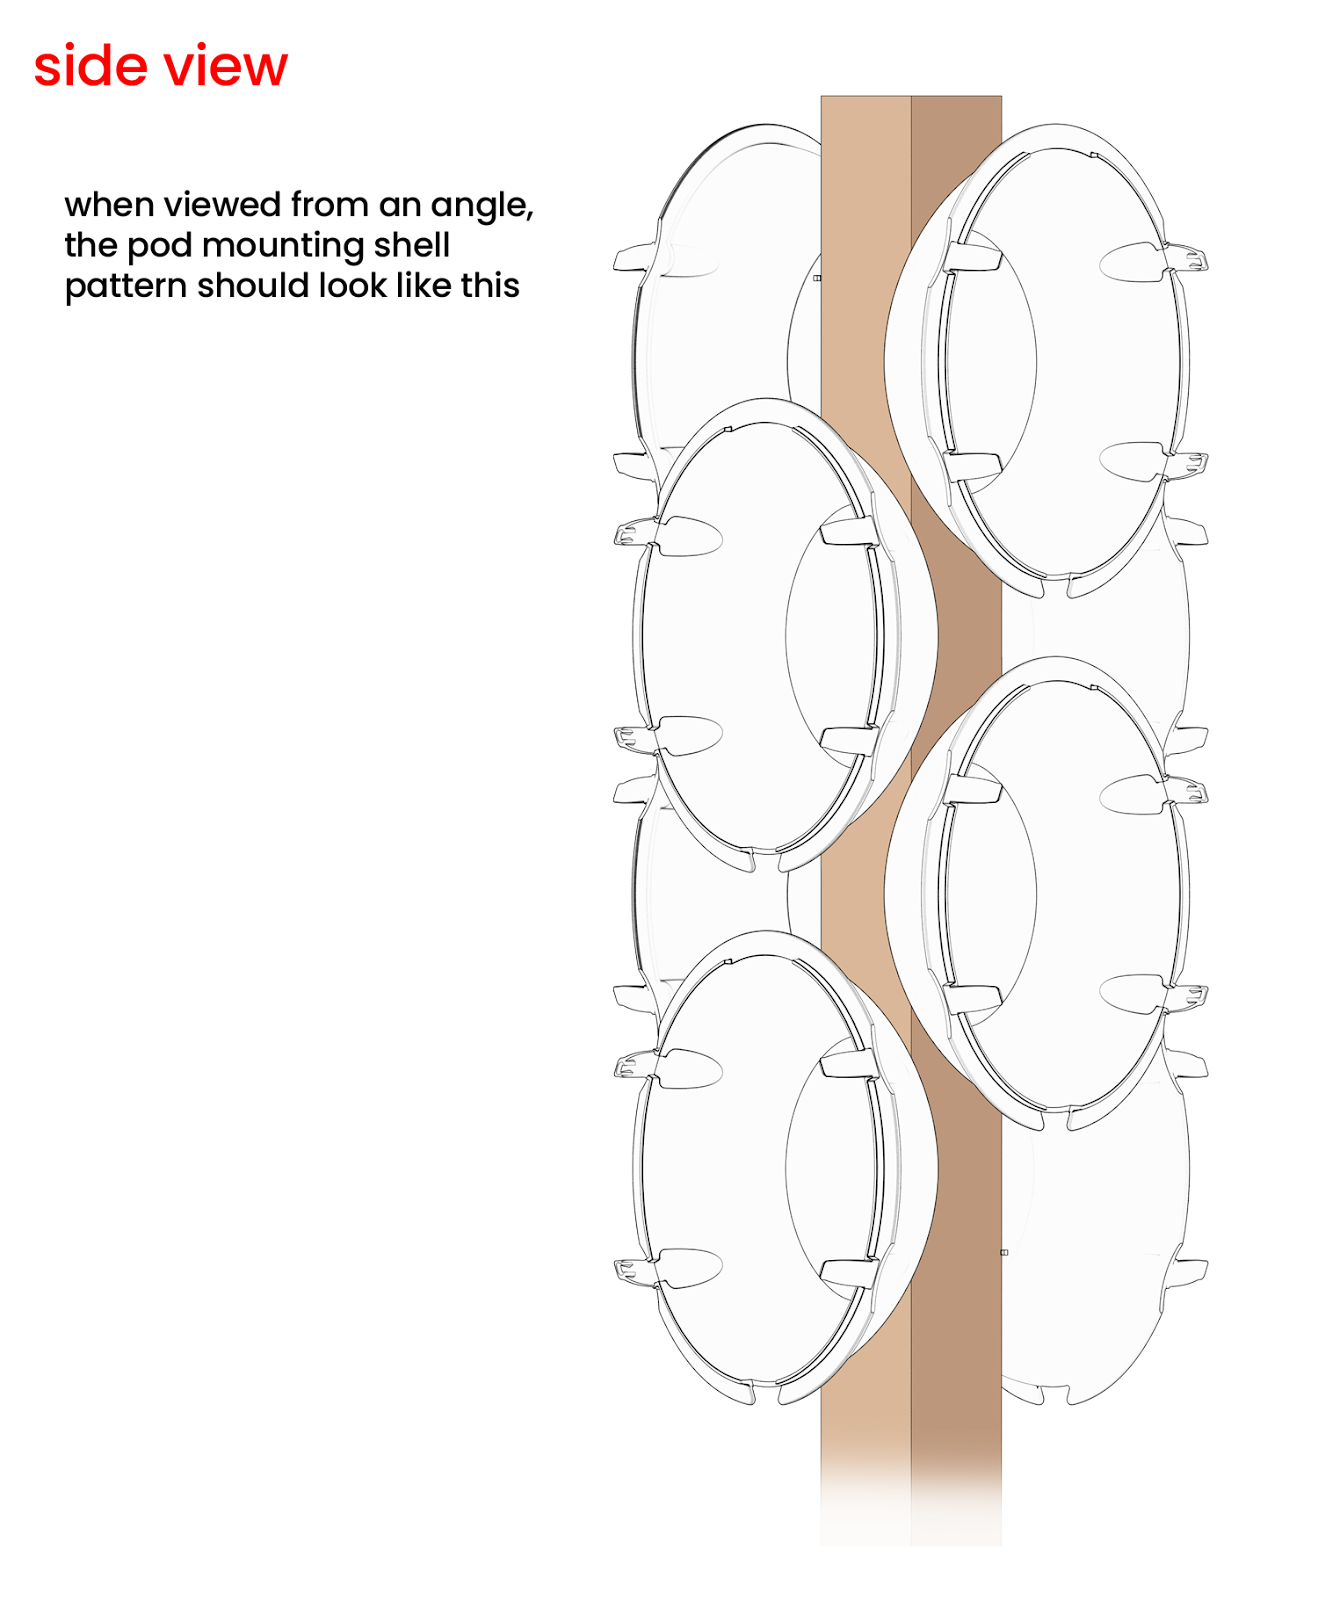
How About the Vertical Distance Between Pods?

We recommend a minimum vertical distance of 28cm (11in) between pods on each side of the post when planning your tower garden.
This allows for good airflow and pod drainage and is ideal for Planter Pods with Trellis Pods that will be supporting vining plants.
Once you have determined your vertical spacing distance for sides A & C, divide that number by 2 to determine the correct offset height for adjacent sides B & D.
For example, if your vertical distance between pods is 28cm, your starting height for sides B & D will be 14cm (28 divided by 2) lower on the post.
Why Eggologic Makes Your Tower Garden Easy
One of the biggest advantages of a tower garden over traditional raised beds is how simple it is to water. This is also where Eggologic Planter Pods come into play. Our pods can be assembled to form as tall and versatile a tower garden as you want.
The drainage holes in the bottom of each pod make watering incredibly simple. The water from the top of the tower drips down into the lower pods, ensuring efficient irrigation while preventing waterlogging that you commonly see with other vertical garden solutions.
Check back here for more growing ideas, plant choices, and tips on how to get the most out of your Eggologic pods!

1 comment
I love this. Perfect for my balcony so that I can grow more herbs than having pots everywhere.
Linda
Leave a comment
This site is protected by hCaptcha and the hCaptcha Privacy Policy and Terms of Service apply.